
📦 Buy the HC-SR04 here: HC-SR04 Ultrasonic Distance Sensor on Amazon
– https://amzn.to/3HsNIz2
📦 Buy the LCD-here: 16×2 LCD Screen on Amazon
– https://amzn.to/4fJYIVo
1. Overview & Goals
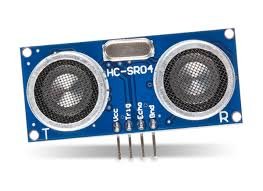
This project shows how to interface the HC-SR04 ultrasonic sensor with an Arduino Uno to measure distances.
We will:
- Wire the HC-SR04 to the Arduino.
- Trigger the sensor to send ultrasonic pulses.
- Measure the echo pulse width.
- Convert that pulse width to a distance in centimeters.
- Display the readings on both the Serial Monitor and a 16×2 LCD.
2. System Architecture
Block Diagram
+--------------------+         +----------------+
|   Arduino Uno      |<------->|   LCD (16x2)   |
|   (5V MCU)         |         +----------------+
|                    |
|  [Trig] ----> HC-SR04 Trigger Pin
|  [Echo] <---- HC-SR04 Echo Pin
|                    |
+--------------------+
- Arduino Uno: Controls sensor and processes data.
- HC-SR04: Sends ultrasonic burst and measures return time.
- LCD 16×2 (I²C): Displays measured distance.
- Serial Monitor: Debug and monitoring.
3. Bill of Materials (BOM)
| Item | Part Number / Description | Vendor |
|---|---|---|
| MCU | Arduino Uno R3 | Amazon |
| Sensor | HC-SR04 Ultrasonic Module | Amazon |
| Display | 16×2 LCD with I²C Backpack (PCF8574) | Amazon / AliExpress |
| Wires | Male-to-Female Dupont Jumper Wires | Amazon |
| Breadboard | Standard Solderless Breadboard | Amazon |
| Power | USB cable for Arduino | Included |
Specs to note:
- HC-SR04 operating voltage: 5V
- Trigger input: 10 µs pulse
- Echo output: Pulse width proportional to distance
4. Hardware Setup
Pin Connections
| HC-SR04 Pin | Arduino Uno Pin |
|---|---|
| VCC | 5V |
| GND | GND |
| Trig | D9 |
| Echo | D10 |
| LCD Pin (via I²C) | Arduino Uno Pin |
|---|---|
| VCC | 5V |
| GND | GND |
| SDA | A4 |
| SCL | A5 |
Notes
- Ensure echo pin does not exceed 5V (safe on Uno, but level shifting needed for 3.3V MCUs).
- Keep sensor face perpendicular to object surface for best results.
- Maximum range: ~4m.
5. Firmware / Software Bring-Up
Toolchain
- Install Arduino IDE from arduino.cc.
- Select Arduino Uno board and correct COM port.
Libraries
Install the LiquidCrystal_I2C library via Library Manager:
Sketch → Include Library → Manage Libraries → Search "LiquidCrystal I2C" → Install
6. Arduino Code
#include <Wire.h>
#include <LiquidCrystal_I2C.h>

#define TRIG_PIN 9
#define ECHO_PIN 10

LiquidCrystal_I2C lcd(0x27, 16, 2);

void setup() {
  Serial.begin(9600);
  pinMode(TRIG_PIN, OUTPUT);
  pinMode(ECHO_PIN, INPUT);

  lcd.init();
  lcd.backlight();

  lcd.setCursor(0,0);
  lcd.print("HC-SR04 Test");
  delay(1000);
}

void loop() {
  // Trigger the sensor
  digitalWrite(TRIG_PIN, LOW);
  delayMicroseconds(2);
  digitalWrite(TRIG_PIN, HIGH);
  delayMicroseconds(10);
  digitalWrite(TRIG_PIN, LOW);

  // Measure echo pulse
  long duration = pulseIn(ECHO_PIN, HIGH);

  // Convert to distance (cm)
  float distance = duration * 0.0343 / 2;

  // Print results
  Serial.print("Distance: ");
  Serial.print(distance);
  Serial.println(" cm");

  lcd.clear();
  lcd.setCursor(0,0);
  lcd.print("Distance:");
  lcd.setCursor(0,1);
  lcd.print(distance);
  lcd.print(" cm");

  delay(500);
}
7. Integration & Testing
Serial Monitor
- Open Serial Monitor at 9600 baud.
- You should see distance values updating every 0.5s.
LCD
- LCD should show:
Distance: XX.XX cm
Test Cases
- Place a flat object at 10 cm, 20 cm, 50 cm.
- Verify readings are within ±1 cm.
8. Performance & Reliability Notes
- HC-SR04 accuracy: ~3 mm in ideal conditions.
- Avoid measuring soft/angled surfaces → poor reflections.
- If readings are unstable, add 10 µF capacitor across VCC & GND.
- For battery-powered setups, reduce measurement frequency to save power.
9. Next Steps & Extensions
- Add buzzer alert when object < threshold distance.
- Log data to SD card.
- Display graph on OLED or web dashboard via ESP8266/ESP32.
- Use multiple sensors for obstacle avoidance in robots.


Pingback: Building a Remote Controlled Robot Car With Arduino - myembeddedsystems.com